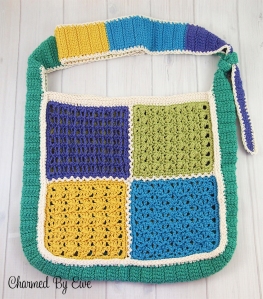
I can’t believe that July went by so fast and that our Stitchin’ Style Handbag CAL is complete! I’ve enjoyed hosting this event with Janaya of Charmed by Ewe and Wendy of The Hooked Haberdasher and we hope you’ve had fun too! Below you will find the complete pattern, just in case you missed any of the weekly posts. ~Maria~
***And now for the winners of the prize giveaway***


Materials:
Approximately 600 yards of yarn, we used DK weight, but really you can use any yarn you want as long as you adjust the hook size
- A 3.75mm/US F crochet hook
- ½ yard – 1 yard of lining fabric (optional, but we recommend it)
- Iron on interfacing strip (optional, but we recommend it)
- Basic crochet tools such as a yarn needle and scissors
- A good attitude and fun spirit!
How to read this pattern
- a. Asterisks indicate to repeat stitches within the ** as instructed.
- b. Parentheses () at the end of a round = total sts for that round.
Abbreviations:
- Beg = Beginning
- Ch(s) = Chain(s)
- Dc =Double crochet
- Dec = decrease
- PUFF st = Puff stitch
- Ldc = Long double crochet
- LKDC = Linked double crochet
- R = Row
- Rep = Repeat
- Sc= Single crochet
- Sdc = Spike double crochet
- Sl St = Slip stitch
- St(s) = Stitch(es)
- YO = Yarn over
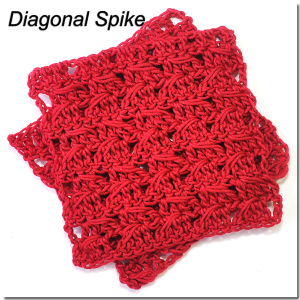
 Diagonal Spike Stitch
- Model made with Omega Sinfonia
- Hook size: F-5 (3.75mm) or size needed to make gauge
- Gauge: 22 st x 9 rows = 5×5”
Spike double crochet (Sdc) = YO, insert hook into same space that first dc of previous 3 dc block was worked, YO, draw loop through long and even with working row so as not to crush 3 dc block, *YO, draw through 2 loops* twice. For a visual reference, find the video tutorial here.
R1: Ch 23 with moderate tension (rather loosely).
R2: Dc 3rd ch from hook (count as 1 dc), *1 dc into each of next 3 chs, skip next ch and work 1 Sdc over it instead; rep from * ending 1 dc into last ch, turn. (22)
R3: Ch3 (count as 1 dc), skip 1 st, *1 dc into each of next 3 sts, skip next st and work 1 Sdc over it instead*; rep between ** ending 1 dc into top of turning ch, turn. (22)
R4-9: Repeat R3. DO NOT FASTEN OFF – skip to SC Border for Joining Squares
 Ridged String Network Stitch
- Model made with Omega Sinfonia
- Hook size: F-5 (3.75mm) or size needed to make gauge
- Gauge: 28 sts x 18 rows = 5×5”
For a visual reference, find the video tutorial here.
R1: Ch 30 with moderate tension (rather loosely).
R2: (right side) 1 sc into 2nd ch from hook, *ch 3, skip 3 chs, 1 sc into next ch*, repeat between** to end, turn. (29)
R3: Ch1, working into back loop only of each st work 1 sc into first st, *ch 3, skip 3 chs, 1 sc into next sc; repeat ** to end, turn. (29)
R4-18: Repeat R3. DO NOT FASTEN OFF – skip to SC Border for Joining Squares
 Spatter Stitch
- Model made with Brava Sport
- Hook size: F-5 (3.75mm) or size needed to obtain the gauge
- Gauge in SC: 18 sts x 20 rows = 4″ (10 cm)
R1: Ch 26, sc in the 2nd ch from hook, *skip ch 2, in next ch make [1 dc, ch 2, 1 dc, ch 2, 1 dc], skip ch 2, in next ch make 1 sc*, repeat between * to end, turn (17 sts, 8 ch-2 spaces)
R2: Ch 4 (counts as first dc and ch 2), in the first sc make 1 dc, skip the next dc, make 1 sc in the next dc, *working into the next sc make [1 dc, ch 2, 1 dc, ch 2, 1 dc], skip the next dc, sc into next dc*, repeat between * to last sc, in last sc make [1 dc, ch 2, 1dc], turn (17 sts, 8 ch-2 spaces)
R3: Ch 1, sc in first st, skip next dc, *into next sc make [1 dc, ch 2, 1 dc, ch 2, 1 dc], skip next dc, sc into next dc*, repeat between * to end, making the last sc in the 2nd ch of the ch-4 from the previous row, turn (17 sts, 12 ch-2 spaces)
R4 – R12: Repeat R2 & R3, ending with a repeat of R2. DO NOT FASTEN OFF – skip to SC Border for Joining Squares.
 Boxed Puff Stitch
- Model made with Reynolds Rise & Shine Mercerized
- Hook size: F-5 (3.75mm) or size needed to obtain the gauge
PUFF St: *YO, insert hook in st, YO and pull loop through* 4 times (you will have 9 loops on hook), YO and pull through all 9 loops, ch1 to lock st.
Long double crochet (Ldc): work dc in st of previous row stretching to height of current row.
R1: Ch 23, work PUFF St in 5th ch from hook, *skip 2, (dc, ch2, PUFF St) in next st*, repeat between ** to last 3 sts, dc in last st. (6 PUFF st)
R2: Ch1, turn, *Ldc in first skipped ch of row below, sc in PUFF St, sc in ch2 space*, repeat ** to end, sc in 3rd ch of beg ch5. (19)
R3: Ch5 (counts as dc + ch2), PUFF St in next st, *skip 2, (dc, ch2, PUFF St) in next st*, repeat between ** to last 2 sts, dc in last st. (6 PUFF st)
R4 – 16: Repeat Rows 2 & 3 ending with a repeat of Row 2. DO NOT FASTEN OFF – skip to SC Border for Joining Squares.
SC Border For Joining Squares:
Ch1, *work 22 sc evenly to st before corner, 3sc in corner st*, 4 times. Join with sl st to beg sc. Fasten off.
Tip: To assist in placing the 22 stitches evenly across the square, divide the square edge into 4 sections and figure out how many stitches you’d need to have in each section to make it even – I did 5 in the first section, 6 in the next 2 sections and 5 in the final section.
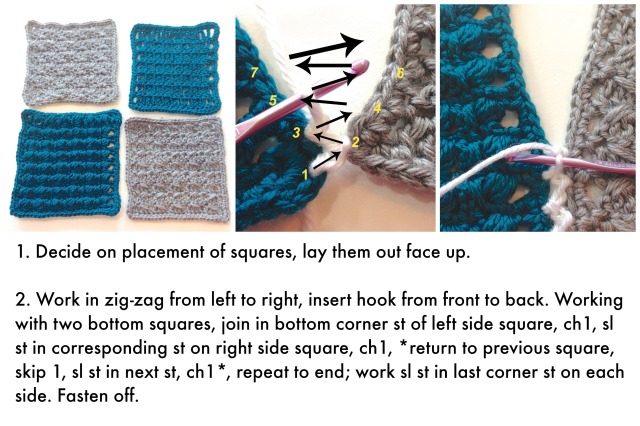
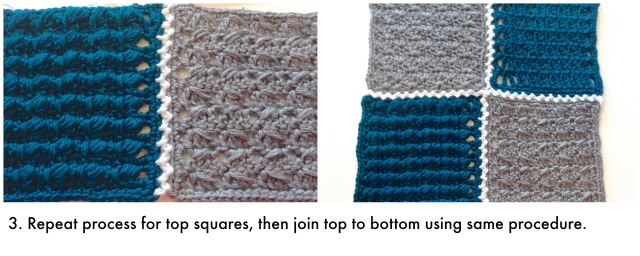
Joining Squares
 Top band – See instructions for linked dc in Strap ad Gusset section
Final Round: Ch1, turn (working from right side), 3sc in same st (corner), sc each st to next corner, *3sc in corner, sc in each st to next corner*, repeat to end. Join with sl st to beg sc, work a sl st across each st of top to reinforce bag opening. Fasten off. Note: Be sure to have same number of stitches on top and bottom and left and right sides.

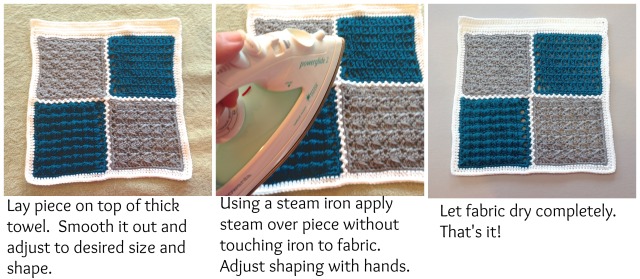
Blocking:
For a professional finish, I recommend blocking your work at this point. Blocking will give you a smoother, squared off and neater fabric to work with. There are many ways to block and many tutorials on the web, but for my projects I keep it simple – steam blocking with an iron. Here’s how I do it:
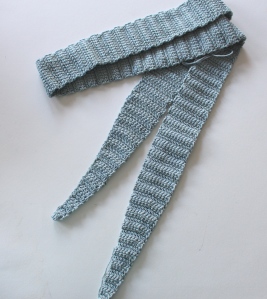
Strap & Gusset
 Gauge in LKDC: 18 sts and 10 rows = 4″ (10 cm)
Linked Double Crochet Turning Stitch: To begin a row with LKDC start by chaining 3, pull up a loop in the 2nd chain from hook, pull up a loop in the first st of the row, YO and pull through 2 loops, YO and pull through 2 remaining loops on hook (first LKDC made).
Linked DC (LKDC): Pull up a loop in the horizontal bar at the front middle of the previous stitch, pull up a loop in the next st, yarn over and pull through 2 loops, yarn over and pull through 2 remaining loops on hook.
Linked DC Decrease: Pull up a loop in the horizontal bar at the front middle of the previous stitch, pull up a loop in next st, yarn over and pull through 2 loops, but do not complete the st, pull up a loop in next st, yarn over and pull through 2 loops, yarn over and pull through all remaining loops on hook.
(I used this site for visual reference: http://www.mooglyblog.com/linked-double-crochet/)
R1: Ch 3, pull up a loop in 2nd ch from hook, pull up a loop in 3rd ch, YO and pull through 2 loops, YO and pull through 2 remaining loops on hook (counts as first LKDC), make 2 LKDC in the 3rd ch, turn (3)
R2: Ch 3, LKDC in each st, turn (3)
R3: Repeat R2
R4: Ch 3, LKDC in first st, make 2 LKDC in next st, LKDC in last st, turn (4)
R5: Ch 3, LKDC in each st, turn (4)
R6: Ch 3, LKDC in first 2 sts, make 2 LKDC in next st, LKDC in last st, turn (5)
R7: Ch 3, LKDC in each st, turn (5)
R8: Ch 3, LKDC in first 2 sts, make 2 LKDC in next st, LKDC in last 2 sts, turn (6)
R9: Ch 3, LKDC in each st, turn (6)
R10: Ch 3, LKDC in first 3 sts, make 2 LKDC in next st, LKDC in last 2 sts, turn (7)
R11: Ch 3, LKDC in each st, turn (7)
R12: Ch 3, LKDC in first 3 sts, make 2 LKDC in next st, LKDC in last 3 sts, turn (8)
R13: Ch 3, LKDC in each st, turn (8)
R14: Ch 3, LKDC in first 4 sts, make 2 LKDC in next st, LKDC in last 3 sts, turn (9)
R15: Ch 3, LKDC in each st, turn (9)
R16: Ch 3, LKDC in first 4 sts, make 2 LKDC in next st, LKDC in last 4 sts, turn (10)
R17: Ch 3, LKDC in each st, turn (10)
R18: Ch 3, LKDC in first 5 sts, make 2 LKDC in next st, LKDC in last 4 sts, turn (11)
R19: Ch 3, LKDC in each st, turn (11)
R20: Ch 3, LKDC in first 5 sts, make 2 LKDC in next st, LKDC in last 5 sts, turn (12)
R21: Ch 3, LKDC in each st, turn (12)
R22 – 154: Repeat R21
At this point, the strap should measure approximately 71“ from end to end. If you want a longer or shorter strap, adjust the number of Rows before continuing.
R155: Ch 3, LKDC in first 5 sts, LKDC dec, LKDC in last 5 sts, turn (11)
R156: Ch 3, LKDC in each st, turn (11)
R157: Ch 3, LKDC in first 5 sts, LKDC dec, LKDC in last 4 sts, turn (10)
R158: Ch 3, LKDC in each st, turn (10)
R159: Ch 3, LKDC in first 4 sts, LKDC dec, LKDC in last 4 sts, turn (9)
R160: Ch 3, LKDC in each st, turn (9)
R161: Ch 3, LKDC in first 4 sts, LKDC dec, LKDC in last 3 sts, turn (8)
R162: Ch 3, LKDC in each st, turn (8)
R163: Ch 3, LKDC in first 3 sts, LKDC dec, LKDC in last 3 sts, turn (7)
R164: Ch 3, LKDC in each st, turn (7)
R165: Ch 3, LKDC in first 3 sts, LKDC dec, LKDC in last 2 sts, turn (6)
R166: Ch 3, LKDC in each st, turn (6)
R167: Ch 3, LKDC in first 2 sts, LKDC dec, LKDC in last 2 sts, turn (5)
R168: Ch 3, LKDC in each st, turn (5)
R169: Ch 3, LKDC in first 2 sts, LKDC dec, LKDC in last st, turn (4)
R170: Ch 3, LKDC in each st, turn (4)
R171: Ch 3, LKDC in first st, LKDC dec, LKDC in last st, turn (3)
R172: Ch 3, LKDC in each st, turn (3)
R173: Ch 3, LKDC dec over next 3 sts, do not turn (1)
SC Border: Ch 1, work SC stitches evenly around the entire strap. Join with sl st to beg SC. Fasten off.
Joining Gusset
Decide where you want the handles to tie (top center, one of the sides).
Mark the gusset and the bag side. Line up the stitches on both pieces all the way around to the top of the bag. With the gusset facing you, join yarn and sl st through both thicknesses down the side, across the bottom and up the opposite side to join the gusset to the bag. Fasten off.
Repeat for the other side.
Take the tapered ends of the straps and tie in a knot. With a small piece of yarn and tapestry needle, sew through the knot to secure it.
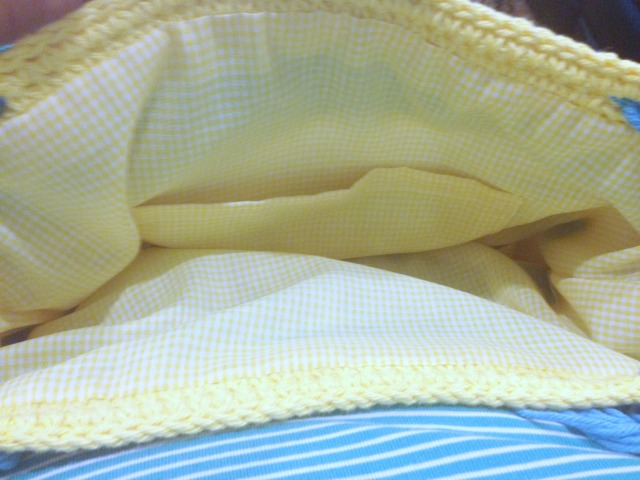
Lining your handbag
If you would like to line your handbag (strongly suggested), here’s an easy tutorial –
How to Line A Crocheted Bag
**********************************************


")


")


![1Paradise-Sailor-Suit-(1)-c[1]](https://thepatternparadise.files.wordpress.com/2013/10/1paradise-sailor-suit-1-c1.jpg?w=464&resize=464%2C311#038;h=311 "1Paradise-Sailor-Suit-(1)-c[1]")


